Place the macOS installer on an exterior hard drive and use it to set up OS on a Mac.
Sure! You can make a bootable flash installer of the Mac operating system or OS X to install old/new versions of macOS on many machines, if willing to do a clean installation of the macOS. In this post by Blogging Coffe, we are to go through steps needed to make a bootable flash installer of OS X. Whether you may install the newest version of macOS on many Macs or do a clean install of the macOS, just be prepared with an emergency disk if your Mac experiences create problem: there seems No Connection to the internet while at Recovery mode.
If you wish to know making a macOS installer download or an older version of Mac OS X or macOS, this post may help you about. You can use your bootable installer to set up the MacOS on a single volume of your hard drive. Really it is an easier way to return to an older version of MacOS X or MacOS. Happily, creating a bootable installation of the MacOS became a lot easier after Apple commenced OS X Mavericks in 2013. With that version of Mac OS X, it has been probable to make use of the Terminal command createinstallmedia to make a bootable installer of macOS.
There are two things that will help you to make a bootable flash installer of OS X. The whole process is just a click away to execute.
- 12GB Flash Drive: We suggest you a 12GB drive; this will be more than you require. We advise also to a Flash memory stick as it will be faster. Also you will profit from USB 3: this will be only choice, if you have a newer Mac. If you have data on the drive you plan to use to, you may need to move it to another drive, as it will be finally formatted. Relying on which version of macOS you are using, you will either be able to install files from software update, or you will have to get them from elsewhere.

Yes Mac App Store is possibly the easier alternative, but there can still be difficulties relying on which version of macOS your machine is running. If you were wishing to get older installation files that can be tricky, we help you know to get older versions of macOS. It seems without saying that you may need software, while installing version of macOS, if it needs to ensure for firmware or confirm your iCloud credentials.
- Get MacOS Installation Files: As we discussed previously, getting the installation files will rely on the version of macOS you are using presently and the version you wish the installer for. Below you will know how to get installers and older versions of the macOS or Mac OS X. This post can help you to download old Mac OS X and macOS versions. Here are points useful to get installation files. If you wish to get the installer for new macOS, or macOS Catalina, then you need to follow these steps.

- If you are using Mojave on your Mac, go to Software Update.
- Wait as your Mac looks for the latest update to macOS.
- As it explains you that the OS update is available to download, then go forward and download the installation files.
Stop before clicking to install, you should copy this installation file on your Mac if willing to access to it to create bootable USB Mac disk utility. You can also run the Mac OS straight from an external drive rather than your integrated startup disk; it is useful if you are checking new versions of the Mac operating system. Also know about easiest way to make a USB flash installer.
There are few of points to help you know, as given below:
- Download the macOS Sierra installer.
- Put in an 8GB flash drive.
- Open up Disc installer and do a Click on the “Select the OS X Installer” button.
- Get the Sierra installer file; it should be positioned in your applications folder.
- Pick your flash drive from drop-down menu.
- Do a Click on “Create Installer.”
When it is finished, put in your USB drive into any Mac and then start the installer by suppressing the option key when you order Boot Up to your computer.
3. Terminal: If you do not wish to download an extra bit of software, then you can create your own installer USB drive by Terminal.
- Download the macOS Sierra installer to create high Sierra bootable USB.
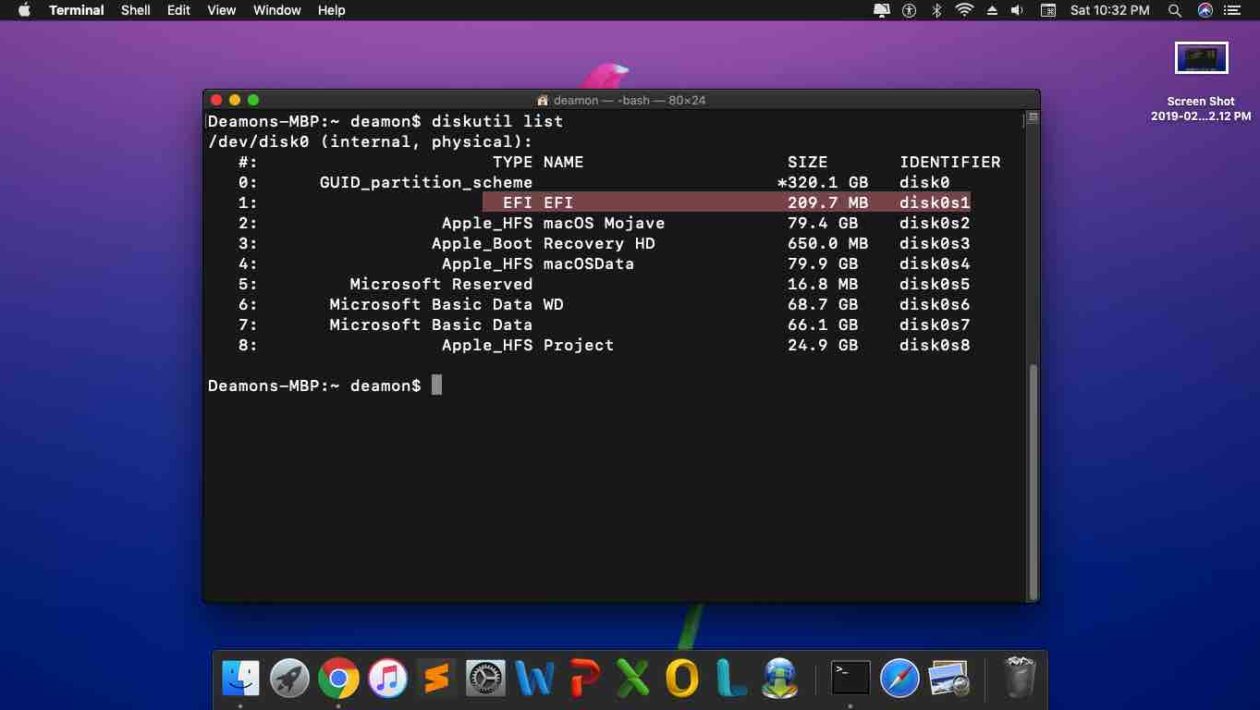
- Insert an 8GB flash drive and name it. Here we will take the name ABC. Ensure the drive is formatted for OS X Extended. If it is not, then bring in Disk Utility. Before you do so, back up any significant data on that drive. It is best to cut off any other external hard drives to not combine them.
- Open up Terminal.
- Type this command into Terminal, replace ABC with name of your drive, then press Enter:
/Applications/Install\ macOS\ Sierra.app/Contents/Resources/createinstallmedia –volume /Volumes/ABC –applicationpath /Applications/Install\ macOS\ Sierra.app –nointeraction &&say Done
- Type in your password when driven and press Enter.
- Let the command line execute its task and do not stop it until you observe the last line that says Done.
When it is over, put in your USB drive into any Mac and then begin the installer by holding back the option key when you order Boot Up to your computer.
createinstallmedia commands
createinstallmedia command will be somewhat dissimilar relying on which version of macOS you are wishing to use. Keep in mind MyVolume may have a diverse name for you. For instance, it might be USB or alike. Enroll Disk Utilities; it is term of the external disk you use.
High Sierra
/Applications/Install\ macOS\ High\ Sierra.app/Contents/Resources/createinstallmedia
Sierra
/Applications/Install\ macOS\ Sierra.app/Contents/Resources/createinstallmedia
Mojave
/Applications/Install\ macOS\ Mojave.app/Contents/Resources/createinstallmedia
Catalina:
/Applications/Install\ macOS\ Catalina.app/Contents/Resources/createinstallmedia